Caucasian Curry

Caucasian Curry
Thursday, May 2, 2013

Chocolate Covered Chicharrones


chocolate covered bacon?...no

old news...

CHOCOLATE COVERED CHICHARONES !

dare i say...BETTER THAN BACON ?!


this is another one of those...

"it cant be true"
"no you didn't !"
"i don't think so..."

GIVE ME ANOTHER !...GIVE ME MORE !


these are a must for your Cinqo de Mayo festivities.


SPICY CHOCOLATE COVERED CHICHARONES
with roasted salted almonds

what you'll need...
chichaorones...the real ones are best.  i didn't weigh mine, but buy extra because you'll be surprised how far the dipping chocolate will go.  you'll find them at a Mexican market like NORTHGATE in Santa Ana, El Matate in Costa Mesa and sometimes at your local convenience store.  they are a little more hard and dense than the ones you see at the supermarkets.  i haven't tried the puffy store brand like Mission Pork Rinds because i don't think they would hold up as well.  they seem to de-crisp with any little moisture.
1 lb. "coverture" dark chocolate.
i find Guittard Chocolate Wafers to work best for a clean dip.
roasted salted almonds, chopped
red pepper flakes

get everything out that you might need.  like tray for drying/setting lined with parchment.   chop the almonds and put some pepper flakes in a little bowl.
TEMPER YOUR CHOCOLATE... i wont go into the EASY MICROWAVE METHOD because you can find it HERE in my post about Chocolate Cover Bacon and HERE from Alton Brown.   tempering is a must for a good clean crispy snappy finish.

dip only a few at a time and sprinkle with almonds and pepper flakes before the chocolate sets.
work in a cool room or at night.  if chocolate isn't setting quickly, put the tray in the fridge for just a few minutes to set, then remove from fridge.
these stayed crunchy and fresh for a few days in an airtight container in a cool room.

You have read this article candy / chocolate / mexican / out of the ordinary with the title . You can bookmark this page URL https://caucasiancurry.blogspot.com/2013/05/chocolate-covered-chicharrones.html. Thanks!
Tuesday, April 30, 2013

Mexican Mole Truffles


authentic Mole usually has a zillion ingredients.
with all it's many layers of complex flavors, it seems to be one of the "mother sauces" of Mexican food
AND everybody's Mother has their own interpretation of this classic "mother sauce".

being that mole is well known for it's chocolate enhancement...
i thought why not make a MOLE TRUFFLE ?

to keep with the mole tradition of a zillion ingredients, i tried to add in as many of the classic ingredients as possible.  i know it sounds involved, but the flavors hit you in layers and you can almost taste each one as the chocolate melts and lingers on the palate.

OR in a nut shell...

it's a darn GOOD CHOCOLATE  BALL


MEXICAN MOLE TRUFFLES

1 Valrhona 61% dark chocolate bar...8.5 oz....chopped small
3/4 cup plus 1 Tbsp whipping cream
1/2 - 3/4 tsp cinnamon
1 Tbsp dark brown sugar
1/2 - 3/4 tsp ground cumin, rounded
1/4 tsp chipotle powder
1/2 rounded tsp Mexican oregano
1/2 rounded tsp espresso powder
1/8 tsp ground cloves
1/8 tsp ancho chili powder
1-2 tsp molasses
1/4 tsp almond extract
1/2 tsp vanilla bean paste or extract
15 raisins, chopped...more (softened) if adding into truffle.
roasted salted almonds and cocoa powder for rolling

put chopped chocolate in a glass bowl and set aside.
in a small sauce pan add the cream, brown sugar, cinnamon, cumin, chipotle, oregano, espresso powder, cloves, ancho chili powder and raisins.  bring to an "almost boil"...turn off heat and let sit for 15 minutes, stirring every now and then to prevent a skin on top.
bring temperature back to almost boil...just bubbling around the sides.
pour cream mixture over chocolate THROUGH A STRAINER.  lightly press what you can through the strainer.
begin stirring from the middle.  as the mixture comes together, stir all around to incorporate.  add vanilla bean paste, almond extract, and molasses.  stir to incorporate.  TASTE TEST.  you might  need a little more...something...you be the judge.
let it sit for a bit.  when it's getting close to room temp give it another stir and stick it in the fridge...UNCOVERED.  in an hour or so come back to it,  COVER IT and leave it for a few hours or over night is better.  it should be completely set.
when ready to roll, bring it out of the fridge for a while until it is a bit more pliable or easy to scoop.   roll into 3/4 inch balls using thin rubber gloves.  gloves make this process much easier and less messy, trust me...go get some.  at this point you can roll them in cocoa powder, chopped roasted salted almonds or dip in tempered dark chocolate.  please DO take the time to temper your chocolate if dipping.  check here for some tips and tricks i've learned so far and check here for some good tempering info.
keep truffles in the fridge and re-roll in cocoa powder if necessary just before serving for a fresh look.  truffles are best texture at room temp.


NOTE...for the first batch i strained the raisins out...but for the second batch i added in some soft raisins, chopped small.
ALSO...i have found that brands of good chocolate behave differently.  Valrhona seems to be a harder set than Guittard Coverture and Scharffenberger.  not to worry they all set and are delicious...but i DO recommend using Guittard "coverture"dark chocolate for dipping.


You have read this article candy / chocolate / mexican / spicy / truffles with the title . You can bookmark this page URL https://caucasiancurry.blogspot.com/2013/04/mexican-mole-truffles.html. Thanks!
Saturday, April 27, 2013

Low cal.-Low Fat, Moist Delicious Cupcakes...too easy


are you really serious about that BIKINI ? 

go to the gym 4 times a week ?

eat fish and vegetables EVERY DAY ?

give up on all the sweets ???

NO...but you might want to consider some alternatives...

BEWARE...that swimsuit will be moving to the front of the closet before you know it.


DIET SODA CUPCAKES
original found everywhere on google, but i like Skinnytastes blog
makes 18 "good size" cupcakes at about 100 calories each...

1 box cake mix
for this one i used the sugar free vanilla cake mix
10oz diet soda. i used diet ginger ale
2 egg whites, slightly beaten

preheat oven according to cake mix
spray muffin tins (these stick to paper cups)
OR...i  like to use silicon muffin cups, then put them in paper cups after cooled.  i HATE it when some of my cupcake sticks to the paper!

mix eggs, cake mix and soda
pour into cupcake cups of choice... 3/4 full
bake as directed on the box.
let cool completely and add icing...SPARINGLY

ICING
1 cup powdered sugar
1/2 tsp vanilla or lemon extract
1-2 Tbsp milk of choice
add only enough milk to get icing consistency.  if it's too thin add powdered sugar...too thick? add a little more milk.
put into a small freezer baggie and cut the tip for an easy throw away piping bag.  you probably will not use all the icing (icing equals more sugar...equals more calories).  save in the fridge in the piping baggie for the next batch you will be making soon.

NUTRITION (approx,) PER 18 CUPCAKES
without icing...82 cal...19.4g carbs...1.7g protein...2.3g fat...0 sugar
with icing (if using ALL the icing), i'm guessing....110 cals, 26g carbs and 6g sugars

use the icing sparingly and they will be about 100 cals each for a good size cupcake.

go ahead, eat 2 !

BY THE WAY....the flavor combinations are endless...chocolate cake with diet cherry soda, 7 up with lemon cake, pineapple ginger ale (shown here),  cream soda with vanilla cake,  diet chocolate soda with chocolate cake(shown here)?...
you get the idea...

You have read this article cake / cupcakes / easy / low carb / low fat / sweets with the title . You can bookmark this page URL https://caucasiancurry.blogspot.com/2013/04/low-cal-low-fat-moist-delicious.html. Thanks!
Wednesday, April 24, 2013

Banh Gan...Vietnamese Flan with Espresso


and so continues my fascination into the Vietnamese culinary world.
 
there are so many sweets and savories that i find interesting, odd, delicious and dare i say...just a bit SCARY?

scary is what keeps me coming back for more.

this Vietnamese treat is strangely addicting.  i've made it 4 times now with different recipes each time.  one better than the next.  i posted Banh Gan #1 here, but didn't find it necessary to post about the others until this one.  the espresso, chocolate and star anise pair so well with the rich caramelized brown sugar.  the texture was spot on....like a very dense flan or egg custard.

a thin slice or a few simple cubes with a nice little Vietnamese coffee or espresso will settle your afternoon or polish off a lovely dinner party.


lately i find my self roaming the streets of Little Saigon here in Westminster about twice a month.   my first experience was rather unpleasant, but that might be due to the "unknown" and my American ways.  i have since gained a little rapport in a few of the tiny shops.  occasionally i can make the vendors crack a smile or two and let me on a few of their secrets...with translation from a helpful customer.

i still stick out like a sore thumb,  have no idea what anyone is saying to or about me, but it has now become a little more familiar and i feel somewhat comfortable in the chaos of a Saturday afternoon.


VIETNAMESE MOCHA FLAN...BANH GAN
ORIGINAL found at Playing With My Food

12 eggs (apprx. 600g)
1/3 cup (35g) tapioca starch (best to weigh this)
4 tsp single acting baking soda, Alsa brand
pinch of baking soda
1 tsp espresso powder
1 tsp cocoa powder
1 can coconut milk
8 star anise
375g dark brown sugar

preheat oven to 350F
vegetable oil an 8x8 or 9x9 pan
in a sauce pan add coconut milk, sugar and star anise.  bring to a soft boil for a moment, then turn off heat and let steep and cool completely.  remove star anise.  whisk dry ingredients together in a small bowl.   lightly beat egg in a separate bowl then sift dry ingredients in. sifting it in helps create less lumps.  tapioca powder is a hard one to mix in, but combine as well as possible.
NOTE...single acting baking soda works ONCE, when the dry meets the wet.  so it is best not to let that sit.  try to work as quickly as possible (not super speedy) after this point to ensure nice air pocket tunnel  effect.
...at this time put your greased pan into the hot oven for about 5 minutes (empty greased pan).
add cooled syrup/milk mixture to the egg mixture.  combine well.
strain the batter mixture straight into the HOT greased baking pan.  lightly push through left-overs and get this into the oven.
bake at 350F for 30-35 minutes.
remove and cool in pan on wire rack to room temp.
refrigerate and serve chilled.

above is an example of the Banh Gan i found in Little Saigon.  this began the fascination and i have to buy it everytime i'm there.
PS...not to toot my horn or anything...but my trusty taste testers said they preferred mine over the store bought.
You have read this article asian style / custard / out of the ordinary / Vietnamese with the title . You can bookmark this page URL https://caucasiancurry.blogspot.com/2013/04/banh-ganvietnamese-flan-with-espresso.html. Thanks!
Monday, April 22, 2013

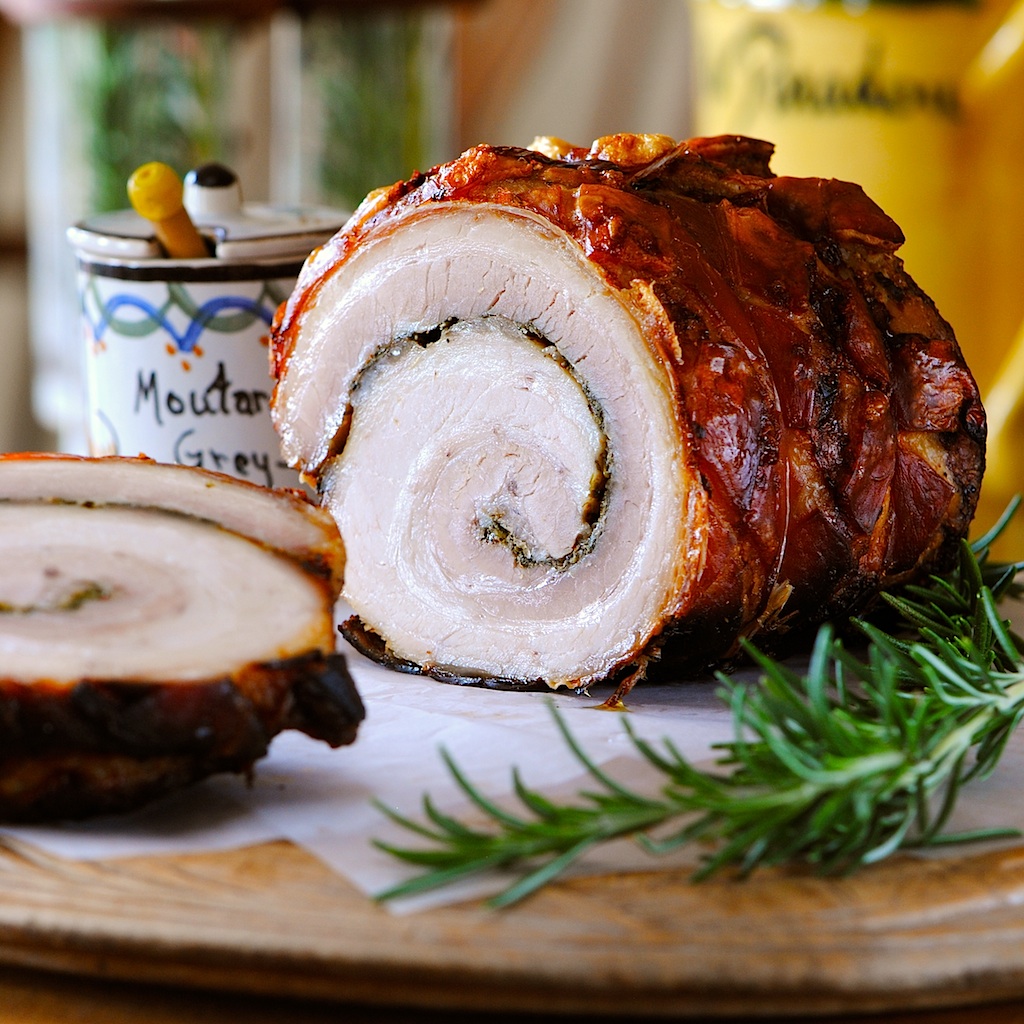
Rolled and Roasted Pork Belly with Fresh Herbs


THE BELLY ROLL...


seasoned, rolled and slow roasted.

unctuous crispy porky goodness.


super easy, no fail pork belly roll.  i've done it twice...once with the savory aromatics and once with brown sugar and chipotle.  each belly requires a little different cooking method and time due to the size and shape of the meat.  this one was done half way in the dutch oven, then moved to a roasting rack.  i suppose the total cooking could be done on the rack, but i wanted to maintain as much moisture as possible and i didn't want the outside to get burnt...this was a very small belly.
this double cooking method produced a moist unctuous pork belly with crispy skin right out of the oven.  it's also delicious served sliced and seared to top off the ultimate burger or layered in a nice hot-off-the-grill panini....oh, maybe a fried egg on top for breakfast?
  anyway you serve it you can't go wrong when pork belly is involved.
don't forget to serve with those delicious rosemary wine pork fat  caramelized onions.

first poke holes all over with metal skewer.  then score skin with a box cutter, as shown.
mise en place your add-ins to make things easier and lower cross contamination. 
 evenly distribute salt, pepper, herbs and thin onion.  then roll and tie.  you might want an extra pair of hands to help get a nice tight roll.  as you can see i did use one tie to hold in the ends.
thick onion as a base with shallow wine and chicken stock...covered for the first hour, uncovered 2nd hour. 
move to roasting rack for another hour or until fork tender, at 325F convection...then crank the oven to 430F and keep a watchful eye 'til skin is crispy.  

ROASTED PORK BELLY ROLL
with fresh herbs

2 lbs, pork belly with skin
(choose a meaty-flatter piece if possible)
1 Tbsp fresh rosemary, minced
1 Tbsp fresh thyme, minced
3-4 Tbsp fresh Italian parsley, minced
about 1/4 onion very thin sliced
1 tsp kosher salt for the inside.
fresh ground pepper
more salt for the outside.

FOR THE DUTCH OVEN if using for the first hour.
2 small white onions, sliced thick
6-8 cloves garlic
a few sprigs rosemary
1/3 cup white wine.
approx. 1/4 cup chicken broth
note...liquids according to size dutch oven.  liquid should not touch the pork roast.  approx. 1/2 inch will do.
preheat oven to 320F
wash the belly and make sure there are no lingering stray hairs.  dry it well.  poke holes in the skin all over with a sharp skewer, as shown.  score the skin with a box cutter, as shown.  with skin side down, dress the meat side with salt and pepper.  mine took about 1 tsp salt...i had a rather small piece.  sprinkle herbs and lay out some thin slices of onion, as shown.  get your string cut and ready.  roll the belly.  it's easier if you have a friend help with this to get it tight. if it doesn't work well one way, go a head and try the other end first.  stuff will fall out, but don't worry.  i used three strings going around and one string holding the ends in.  pork belly can protrude in strange directions and i wanted a nice tight roast.  
dry the outside with a paper towel and sprinkle with salt.

this step might not be necessary, but i started in a dutch oven....
i think it helped cook the roast for a while in a nice moist environment.  and it made some delicious rosemary wine onions that were later caramelized when roasting.
put the thick slices of onion and the garlic cloves in the bottom of a dutch oven with a few rosemary sprigs.  lay the roast on top.  add the wine and enough chicken stock to just cover the onions, not touching the pork belly (example photo).
put in the oven covered for 1 hour.  then uncovered for the next hour.
now take the roast out and put it on a rack.  or an aluminum covered tray with the onions underneath (example photo).  i turned the convection on.  roast for 1 more hour.  poke it and see if it is really fork tender.  fork tender all the way through.  you be the judge.  it is very hard to over cook a pork belly.  when fork tender turn the oven up to 430F convection and watch until the skin gets crisp, but not burnt.
take it out and let it rest for about 20 minutes
remove strings and slice with a very sharp knife.

OR...for a delicious warm thick slice on a big burger or sandwich...
cool completely before storing.  i like to wrap in parchment inside a tupperware and lay the cover on...not snapped shut.  the cut roast photos were taken the next day and the skin was still crispy.
i like to rewarm in a medium heat skillet with a touch of butter on both sides.

You have read this article pork belly / roasted with the title . You can bookmark this page URL https://caucasiancurry.blogspot.com/2013/04/rolled-and-roasted-pork-belly-with.html. Thanks!
Friday, April 19, 2013

Sweet Spiced Vanilla Bean Bone Marrow Custard


one can't help feel primal and a bit righteous eating bone marrow for breakfast.  
absolutely decadent, healthy and delicious way to start your day.

OR...serve this for a flashy finish to a super carnivorous dinner party.

a dessert your guests won't forget.


don't be afraid...i urge you to try this...even for the conversation aspect alone.  you'll be surprised how unassuming the marrow is.  it tastes pretty must like a rich egg custard, but there's just a little something else to it...a certain je ne sais quoi...perhaps.

I'll bet my fellow "marrow mate", Trevor, at Sis. Boom Blog will be all over this one.


i know you probably think bone marrow is all fat, but they are mainly good fats...monounsaturated.  there are many health benefits as well.  i am not a nutritionist, but i have found that marrow is full of minerals, protein, calcium, vitamin A, phosphorous and iron.  in the 19th century is was regarded as a health food.  Queen Victoria was said to eat it every day...that might be over doing it just a bit, but...
a nice little marrow custard every now and then will do just fine.


SWEET SPICED VANILLA BEAN MARROW CUSTARD
with a few adaptions, but many thanks to the original found at
makes four(4)  7-8oz ramekins

1/4 to 1/3 cup rendered beef marrow
1 cup whole milk
3 large eggs, room temp.
1 vanilla bean, scraped or 1 tsp vanilla bean paste
2 to 3 Tbsp honey
4-5 cardamom pods, crushed open
2 star anise
1 cinnamon stick, 2-3 inch
butter or veg. oil for ramekins


FIRST...but not absolutely necessary (i always do this)...soak your bones in salted water over night or 24 hours.  change the water 2-3 times with salt each time.  this draws some of the blood out.  blood is not bad, but nice white marrow is preferred.  sometimes it's the luck of the draw so you might want to buy more bones than you need so you can pick the prettiest marrow after you see it rendered.  freeze the remainder for "bone butter".
in a small sauce pan add milk, cardamom pods, cinnamon stick, star anise and vanilla bean scrapings.  bring to a boil and turn off heat.  set aside and let steep while preparing marrow.
in a large stack pot, add bones, cover with water and bring to a boil.  they should probably only need a few minutes until they are ready to render out the marrow (photo above).  if you boil them too long they will start to dissolve.  remove bones with slotted spoon and wait until they are cool enough to handle.  over a bowl, run a small knife between the bone and marrow.  the marrow should slide out of the large end of the bone.  there will be some liquid fat.  leave this behind when measuring out the 1/4-1/3 cup for recipe.
pre-heat oven to 350F
put some water on to boil for your bain marie and butter or grease your ramekins.
in a small bowl, mix the eggs and honey.  set aside.
strain you spiced milk into a medium sauce pan.  cut marrow into small-ish pieces for easy blending with an immersion blender.  add marrow to strained milk mixture.
NOTE... i used an immersion blender because i found that the mixture needed to be "slightly" rewarmed while blending.  the marrow can separate and act like solid fat if it meets cooler temperatures or if your marrow has sat and become solid...as did mine.
if your mixture is warm, slowly temper your eggs into the milk/marrow mixture.  blend with the immersion blender until smooth.  if it looks like the fat is separating...rewarm ever so slightly, while emulsifying  until it comes together and blends well. 
pour mixture into greased/buttered ramekins and place into bain marie/large roasting pan.  pour near-boiling water into roasting pan/dish about 1/2 way up the ramekin.  bake in oven 25-30 minutes...they should look just set...maybe a little wobbly in the center.  they will completely set from residual heat.  mine took 23 minutes.


i suggest serving them just a bit warm...on it's own or with a few fresh berries.  they keep well.  i refrigerated 3 and have rewarmed them slightly in the microwave for breakfast...
i feel like i start my day at the top of the food chain.


for more info on Rendering Bone Marrow check this post i did a while back.  next up?...Jennifer McLagan's savory Bone Marrow and Porchini Mushroom Custard from one of her fabulous books, "ODD BITS".  stay tuned

You have read this article custard / dairy / marrow / offal / out of the ordinary with the title . You can bookmark this page URL https://caucasiancurry.blogspot.com/2013/04/sweet-spiced-vanilla-bean-bone-marrow.html. Thanks!
Tuesday, April 16, 2013

Shichimi Togarashi Truffles with Toasted Sesame Seeds and Soy Sauce


the dark chocolate sushi experience...

WHAT?...

NO, there is not fish involved.
i haven't gone totally off the deep end.


BUT... you won't believe these truffles...

spicy, sesame, soy with dark citrus chocolate?!

ABSOLUTELY, UNBELIEVABLY DELICIOUS!


i think i might have come up with something quite interesting this time.  it's like a patron participation interactive truffle experience.

the soy and toasted sesame hit the palate first, then the smooth dark chocolate takes over , but wait...then a slightly citrus warm spice hits you and you find yourself going in for the "double soy dip"...and a little crystallized ginger nibble to polish it off.

IT'S AN EXPERIENCE NOT TO BE MISSED.

what can i say...i get these hair brained ideas and hope that no one else has done something like it.  i always say...there are no "new ideas",  but...at least, if i google the concoction it doesn't show up plastered all over the front page.

a word about SHICHIMI TOGARASHI...also know as "Japanese 7 Spice".  ingredients consist of sesame seeds, orange peel, poppy seeds, paprika, Chinese chiles, Szechwan pepper, ginger and nori.  it's is a delicious spicy blend that goes with just about anything....i found mine at Savory Spice Shop, a fabulous place here in Newport.  i make such an odd variety of things it's nice to know this shop will have it fresh and they sell an ounce, a bag, a jar...whatever you need.


SHICHIMI TOGARASHI TRUFFLES with SESAME SEEDS and SOY SAUCE

250g (1 large bar) Valrhona 61% dark chocolate
3/4 cup full fat canned coconut milk. (heavy cream works as well)
1/2 inch ginger cut into 4 slices
zest from 1/2 large orange
1 to 1 1/2 tsp Shichimi Togarashi spice
toasted sesame seeds for rolling
soy sauce for dipping
crystallized ginger for decor

chop the chocolate into small bits...no large chunks.  set aside in medium glass bowl.  in a small sauce pan add the coconut milk (or heavy cream) and sliced fresh ginger.  bring to an almost boil...just bubbling around the sides.  let simmer for a few moments to infuse the ginger flavor.  pour coconut milk through strainer over chocolate and let sit for a few minutes to begin the melting.  begin stirring from the middle and you will see the ganache start to come together.  add orange zest and shichimi togarashi spices and stir to incorporate.  TASTE TEST...can you taste your spice?...zest?  you don't want any flavor to over power the next.  it should be subtle...don't over do it.  let come to room temp and refrigerate until set.

NOTE...sometimes these take a little extra care.  i have had a few instances with my ganache "breaking" when using coconut milk and Valrhona chocolate.  "breaking" can mean an oily looking surface and or a grainy texture.  there are many ways to fix this and some are too involved.  i have tried them and it's messy.  here's what works for me.  if this happens i reheat the ganache over a double boiler until it is back to liquid and stirable.  take it off the heat and hand whisk...not too too vigorous or you will end up with frosting, but enough to bring it together.  i liken it to RE-emulsifying the mixture.  let sit on the counter and check it in a while.  if it is still separating, give it another stir.  refrigerate until set.

remove from fridge.  let it sit if necessary until you can get a spoonful out.  it's best to work with it chilled.  using thin rubber gloves form balls.  roll in sesame seeds after each ball is formed.  press seeds into bare spots.  mine are approx. 16-18 grams each.  this creates a "two-bite-truffle"...which works well for the double soy dipping.
enjoy the full experience with soy sauce and crystallized ginger.

for a variety i used toasted white sesame seeds, plain and some rolled in shichimi togarasi and black toasted sesame seeds.  keep a watchful eye when toasting seeds.

You have read this article asian style / candy / chocolate / truffles with the title . You can bookmark this page URL https://caucasiancurry.blogspot.com/2013/04/shichimi-togarashi-truffles-with.html. Thanks!